Sunday, December 22, 2013

Essence - Sparkle & Sand Effect

Essence has followed suit with the sand effect polishes by releasing three colours of there own - here are two of them:

Me & My Lover


Here's My Number


The third colour, Hey, Nude, is a very light pink/almost white.  I'm not a big fan of that shade, so I decided not to buy it.

True to Essence's other polishes, these paint on easily with a great brush, the colours are gorgeous, and the price even better (AU$2.75).  Bravo Essence, bravo.

NN

Matchy Match

A week or so ago, my team at work had a Christmas lunch, and to try to get into the spirit, I decided to make an effort for once and wear . . . A DRESS.  Yes folks, you heard it right, I actually wore a dress for a day.  Wonders will never cease!

Anyway, I decided to match my nails to my dress, and here are the results:


I used: Sinful Colors Snow Me White, Models Prefer Little Black Dress and Revlon Matte Coat.


And Whilst I was trying to take pictures of my nails against my dress, my puppy, Ruby, decided to get in on the act. She's such a diva!

NN

Chroma Chameleon

A break now from the speight of tactile polishes I've been reviewing . . .

Revlon has released a collection of duo chrome polishes, and, being a sucker for those also, I picked up the three most interesting:

Amethyst


Aquamarine


Topaz


Amethyst is a purple with a secondary colour of gold.  In the bottle, it shines a bit teal as well, but that only very slightly showed up on my nails.

Aquamarine is a aqua polish with a secondary colour of purple - again, it's only very slight.

Topaz is a light green polish with a secondary colour of gold. In the bottle, it shines blue as well, but it doesn't translate to the nails.

All in all, these polishes are very pretty, but not big on the duo chrome characteristics,

NN

Liquid Sand

Quite some time ago (yes, I'm a little behind with my blog posts), OPI bought out a few ranges which included "Liquid Sand" polishes - James Bond/007, Mariah Carey's special range, and Oz the Great and Powerful (the prequel movie to The Wizard of Oz) range.  Eager to get on board with these textile polishes, I tried out the following:
 
Honey Ryder (007)


Jinx (007)


Solitaire (007)


What Wizardry is this? (Oz)


Get Your Number (MC)


Verdict:  Love love love them!  They paint on easily, dry quickly and are extremely durable.  All lasted on my fingers for several days, although Solitaire became a little grubby towards the end due to make-up application and office work etc.

NN

Sinfully Magnetic

Sinful Colors has released a magnetic range in Australia just prior to Christmas.  There are eight different shades, and here are three of them:

Polar Opposites


Charge it Up


It's Electric


Verdict:  They work!  Polar Opposites was a bit gluggy at first, but if you carefully apply it thinly, it seems to work better, which is contrary to the instructions on the label.  It almost seems that the more coats you apply, the more difficult it is to get the magnet to work its magic.

Googling the polish seems to bring up a snakeskin magnet (which is not what these are), and I would like to try that out, but unfortunately, there only seemed to be the star type of magnet.  I have some old magnet polishes which didn't work very well, so I'll see if those magnets work with the polish for a bit of variation.  I'll keep you posted.

NN

Space Dust

So, my love of all things sparkly and textured continues, with Rimmel's Space Dust.

Space Dust comes in five shades:  Total Eclipse (black with green and purple glitter), Moon Walking (purple), Shooting Star (Silver), Aurora (beige/light pink), and Luna Love (hot pink).

These polishes are two coaters (+), and once they're dry, they have a lovely textured finish (not unlike the Sugar Coat polishes I reviewed in an earlier post.


My favourite is Total Eclipse.  The green and slight purple glitters really set off the textured black polish. 

NN

Sugar for Nails

Yet another textured finish - may I present - BYS Sugar for Nails.

I have two of the kits - Good Ship Lollypop (predominantly blue and purple particles), and Icing on the Cake (pink orange and yellow particles).

Each kit comes with a base nail colour, a pot of sprinkles and a brush to dust off excess sprinkles.

Whilst the sprinkles do last for quite a long time, they're best applied a couple of hours before going out.  They should stay intact for most of the night, but you'll lose a few once you head off to noddy land!

There are quite a few "sugar" nail products on the market at the moment, but I believe these are the closest to actual sugar particles (think chunky raw or coffee sugar).


NN

September Stamping

Just a few (not so) recent stampings . . . .


NN 

Sunday, November 10, 2013

Finally . . . Sugar Coat!

Further to my post all the way back in July (here), it only took four months but . . . (drum roll please) . . . Sally Hansen's Sugar Coat has finally arrived in Australia.

I guess my curiosity got the better of me and I just had to know what they were like (even though the abovementioned post demonstrates how you can create a homemade version of your own).

These polishes are relatively easy to apply, fairly quick to dry, and look fantastic.  Here are the shades:


Bubble Plum

 
Sugar Fix

 
Sour Apple


Cotton Candies


Cherry Drop


Razzle-Berry

There is also Lick-O-Rich, which is black, but my poor fingers got tired of being swatched, so I'll show that one another time.

Another important note is that the collection which has been brought to Australia is missing the yellow shade, Sweetie.  I'm not sure why Sally Hansen feels the need to leave out shades, but it's very annoying!

My favourites from this collection are Cherry Drop, Razzle-berry and Lick-O-Rich, as I believe the darker shades show the texture a bit better than the lighter ones.

I also learned that overseas (i.e. the northern hemisphere), Sally Hansen has released a new range of Sugar Coat colours (as seen on blog Oh Three Oh Four here).  I like the shades from this collection even more than the original, but I suspect they won't hit the shelves in Australia for at least another six or seven months (so I guess I will have to wait).  Until then, I think I can have some fun with these ones!

NN

Monday, August 12, 2013

Trend Alert: Monochrome

MONOCHROME


As a fan of all things black, I'm enjoying the monochrome trend.  It also makes nail designs look super crisp and fresh.

Here's a few ideas I've tried:

Houndstooth


 Animal Prints 


Aztec  


B&W Glitter 


Crackle 


Main polishes used:  Sinful Colors - Snow Me White, Models Prefer - Little Black Dress
Glitters:  Sally Hansen Fuzzy Coat - Tweedy, Models Prefer - Star Dust, Missha Lucid Nail Polish Dazzling - No. 6, BYS Confetti Top Coat - White Noise, all over top Sinful Colors - Cool Grey
Crackle:  Avon Mosaic Effects - White
Nail Pen:  Sally Hansen - Nail Art Pen - Black

NN

Saturday, August 3, 2013

A couple of misc glitters

I was just playing around, and created these manis:

Sportsgirl Nail It - Fantasy (index, middle, pinky) and Sportsgirl Nail It - Rose Gold (ring & thumb)


Sally Hansen Fuzzy Coat - Fuzz-Sea (on top of Australis - Indie)


Australis- Carnivale Chaos & Australis- Rio Riot (ring) on top of OPI - Did you 'ear about Van Gogh


Sally Hansen Fuzzy Coat - Tight Knit over Savvy - Aubergine


NN

Sprinkles and star dust

Further to my earlier post on Sally Hansen's Sugar Coat, and my take on how to create them in the meantime (until they hit the shelves in the Australian summer), here are a few swatches of the Gem Crush range, and a couple of others which are also gritty and could serve the purpose of being the under-coat for a homemade Sugar Coat mani.

Sally Hansen Gem Crush - Big Money


On reflection, Big Money is not a gritty polish like the other Gem Crush polishes to follow, so I thought I would review it first.  It applies easily and has a smooth finish once dried.  Micro and small gold glitter along with small mauve glitter makes a polish which is sparkly, but understated and not blingy.


Sally Hansen Gem Crush - Lady Luck


Now we're gritting down to it!  A pink/fuchsia glitter with scattered sliver holo glitter, Lady Luck is fabulous and a nice shade to brighten up winter nights!  Almost seems a shame to paint something over top of it.

Sally Hansen Gem Crush - Glitz Gal

 
You've seen Glitz Gal before, here and here, and when I initially acquired it, I wasn't excited about it at all.  I've changed my mind!  Charcoal grey glitter with lots of silver holo glitter, this one is blingy and makes a great base for a gritty mani.
 
Maybelline Color Show - Sea-Quins
 

Sea-Quins is another polish which, whilst you could use it as a base for your gritty mani, it seems a shame to paint over that beautiful colour.  Predominantly teal glitter of various sizes, there is also a small smattering of blue glitter chucked in for good measure.  I LOVE this colour.

Savvy - Glam & Chiq


Last, but not least, is Glam & Chiq, with a translucent blue base, and smatterings of various sized
royal blue cross over into purple glitters.  It's not as dense in glitter as the ones above, so you will require more coats for the same effect.  It is, however, gritty, and will help create a gritty mani.

So there you go.  No waiting for nearly a year after the rest of the world has a product, you can create the same thing now!

NN

Sunday, July 21, 2013

Sugar Coat - I want it NOW!

As mentioned in one of my recent posts, Sally Hansen's Fuzzy Coat is now in stores.  But I have also spotted another texture/tactile product on the interwebs - Sugar Coat.

I contacted Sally Hansen to ask when this range would be available in Australia, since it's already been out for ages in the Northern Hemisphere (favouritism much?), and they said "summer".  Summer's a little bit too far away for my liking, and so it got me thinking . . . how could I recreate the look using the polishes I have now?

And then it came to me (in my sleep, no less), Sally Hansen Gem Crush, underneath ANY CREME POLISH OF YOUR CHOOSING!  That might just work.

I only have Glitz Gal from the Gem Crush range, but I may need to invest in a couple of the others if this experiment works out . . .

Here is Glitz Gal in all it's glory:


Glitz Gal is a charcoal grey, gritty glitter polish with a bunch of holos chucked in for good measure.  Pretty enough on it's own, and, can I say, was ahead of the OPI Liquid Sand/BYS Glitter for Nails/Zoya Pixie Dust collections, and much cheaper.
 
The first step was two coats of Glitz Gal (to ensure super duper gritty-ness).  Luckily, Glitz Gal was extra quick to dry, so I could get to work on my experiment.
 
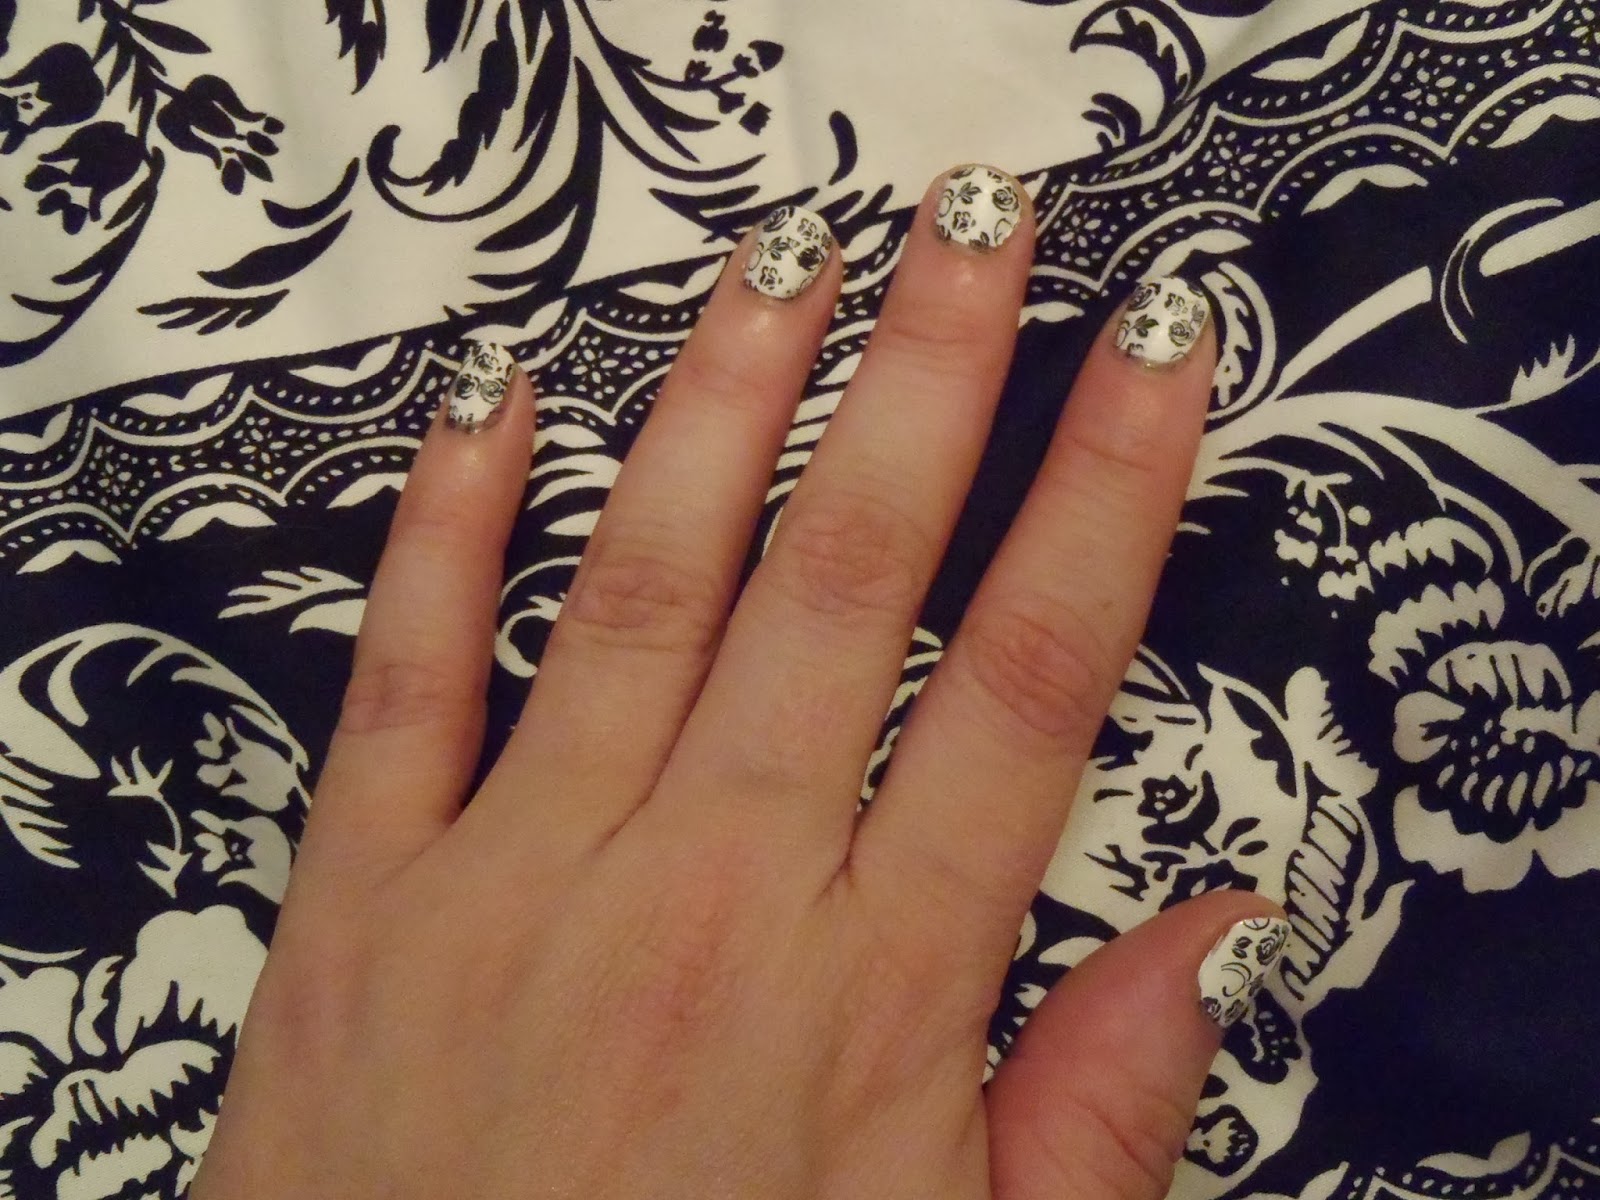
Next, I used one coat of the following polishes for the experiment:  L-R Australis - Aqua, Models Prefer - Little Black Dress, Australis - Knickers in a Knot, Face of Australia - Ocean Villa and on my thumb Sinful Colors - Snow Me White.  This is what the first coat looked like when still wet:


You can see that due to the lightness of Aqua, Glitz Gal is making it less opaque than the others.  Knickers in a Knot is also struggling with the opacity, but the others are coping fine.
 
Next, one more coat, and then wait for it . . .


Ta-da!!!!


So there it is!  My take on Sugar Coat nails.  The darker colours seemed to handle it better (the black and blue look spectacular), but I'm sure if I got a lighter Gem Crush colour, the others would work just as well.

I'm going to do a full set in just the one colour during this coming week and will be sure to post the results.

NN